This article describes how Truck Drivers punch in and punch out of jobs. The process is similar for hourly shifts and dispatch assignments/loads. Slight differences will exist for jobs that require you to upload load slips between loads. These differences are described below. Watch this video to see how.
Punch In to jobs that do not require load slips
When it's time to punch in to your job, you will see an alert in the banner of all main screens (except the Drive screen, where you punch in).
- Go to Drive - Tapping this button will take you to the Drive screen where you can punch in to your job when you are ready to begin.
- Drive - You can also go directly to the Drive screen to punch in to your job up to 5 min before the job is scheduled to begin.
From the Drive screen, tap scheduled job to punch in.
- The job details for your SCHEDULED JOB, including start time, start and end location, and product.
- Tap PUNCH IN to start your job. You may punch in as early as 5 min before the scheduled start time.
- Tap CUSTOMER to call the customer who posted the job. NOTE: If this button is labeled SITE, tapping it will call the site contact who will be receiving your delivery.
- View additional job instructions on the Details tab.
Tap the Locations tab.
- Tap the Locations tab to view the start and end locations to view the job location details. The Start and End locations are listed.
- Tap Open in maps to open your default map app to navigate to the start or end locations.
- Icons for the job Start Location (
 ), the End Location (
  ) for your upcoming job will appear on the map. You will also see an icon for your Company location (
  ) if in view.
Tap PUNCH IN to begin your job.
- Tap PUNCH IN
- Tap YES to confirm you are ready to punch in and begin your job.
View the details of your PUNCHED IN job.
- The job details for your PUNCHED IN job, including start time, start and end location, and product.
- Tap CUSTOMER to call the customer who posted the job. NOTE: If this button is labeled SITE, tapping it will call the site contact who will be receiving your delivery.
- Tap PUNCH OUT when you have completed the job and are ready to punch out.
- Tap Details to review the job instructions, Locations to view the Start and End locations, and Loads to view completed loads and load slips (for load-based jobs and jobs that require load slips - see next section for how to load slips).
Tap PUNCH OUT to end your job.
- Tap PUNCH OUT when you have completed and are ready to punch out of your job.
- Tap YES to confirm.
Punch In to jobs that require load slips
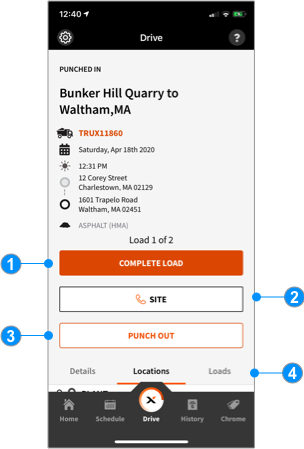
The following describes the process for load-based jobs or jobs that require load slips. Tap COMPLETE LOAD when you are ready to complete your first load.

- Tap COMPLETE LOAD when you have delivered your load and are ready to upload your load slip.
- Tap SITE to call the site contact who will be receiving your delivery. NOTE: if this button is labeled CUSTOMER, tapping it will call the customer who posted the job.
- Tap PUNCH OUT when you have delivered your last load and are ready to end the job.
- Tap Details to review the job instructions, Locations to view the Start and End locations, and Loads to view completed loads and load slips.
Tap OK to allow TRUX to access your smartphone's camera app.
Tap Next to use the picture on your device's screen.
Tap Done to use the picture. Tap Edit Scan to retake.
Enter the tons you have delivered.
- Enter the number of tons from the load slip and scale
- Tap Done to submit.
Tap Dismiss on the submission confirmation message.
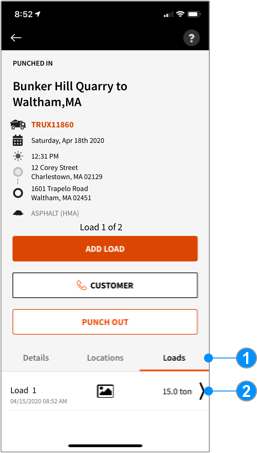
Tap the Loads tab to view completed loads.
- The number of loads completed.
- Tap ADD LOAD as you complete each additional load.
- Tap Loads to view all completed loads and load slips.
Tap Loads to view completed loads.

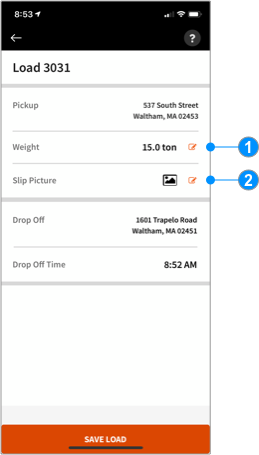
Tap a completed load to view load details.

- Tap
 to edit the tons delivered.
 - Tap
 to view/edit the load slip image.

Comments
0 comments
Please sign in to leave a comment.